AgeVerify Code Generator and Installation Instructions
Let’s Get Started, This Will be Easy!
Begin by selecting your website builder platform below.
If you are not using a website builder platform, choose the ‘Custom / Unknown’ option.
Note, the Code Generator and Installation Instructions below are specifically for the Free / Basic version of AgeVerify. When you’re ready to add in your logo, custom backgrounds, custom colors and more, Go Pro!
Part A – Configure your code: Use the Code Generator to create your AgeVerify Script.
(opens in a new browser tab)
Part B – Installation Instructions: Use the installation instructions to add your AgeVerify Script into your 3dCart website.
Step 1
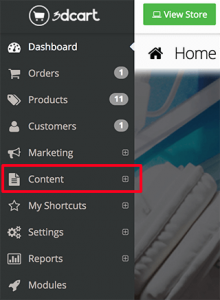
From your 3dCart dashboard, select the ‘Content’ menu option from the left hand side.
Step 2
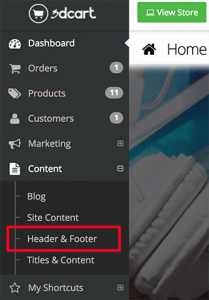
From the expanded Content menu, select the ‘Header & Footer’ menu option.
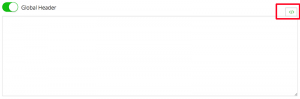
Step 3
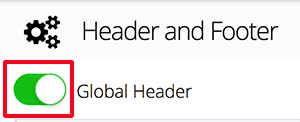
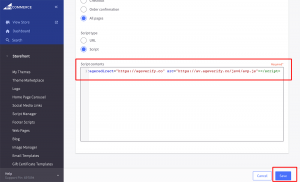
From the Header and Footer page, set the Global Header toggle on.
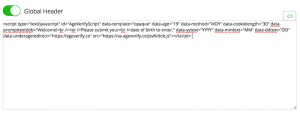
Step 4
Switch the Global Header to a code only view and turn off the WYSIWYG functions by clicking on the small code icon located on the right hand side of the panel. (Note, if the WYSIWYG is turned off, all of the tool icons for the Global Header should disappear.)
Step 5
Paste the red AgeVerify code from the code generator in to the blank box. If you already have code listed in this box, simply add the AgeVerify code on the next line.
Step 6
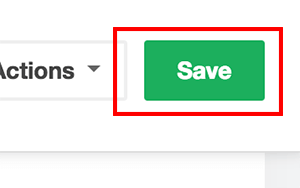
Click the ‘Save’ button at the top right hand corner.

Part A – Configure Your Code: Use the Code Generator to create your AgeVerify Script.
(opens in a new browser tab)
Part B – Installation Instructions: Use the installation instructions to add your AgeVerify Script into your Adobe Muse website.
Step 1
From the Adobe Muse editor, right click on the page(s) you would like to add AgeVerify to.
Step 2
Select ‘Page Properties’
Step 3
Select ‘Metadata’
Step 4
Paste in the AgeVerify script from the Code Generator in to the ‘head’ section.
Step 5
Completely close your web browser and relaunch to see your website with AgeVerify added.
Part A – Configure your code: Use the Code Generator to create your AgeVerify Script.
(opens in a new browser tab)
Part B – Installation Instructions: Use the installation instructions to add your AgeVerify Script into your Big Cartel website.
Step 1
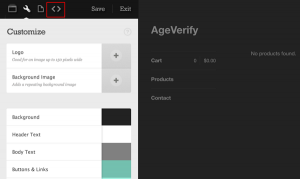
Log into the Admin > Design view of your store and click the ‘<>‘ menu option at the top left hand side.
Step 2
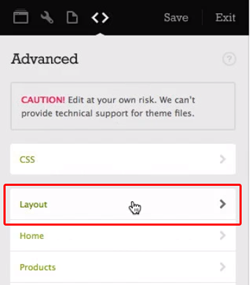
Click the ‘Layout’ menu option on the Left hand side.
Step 3
From the layout file, click the ‘Custom’ button at the top of the window.
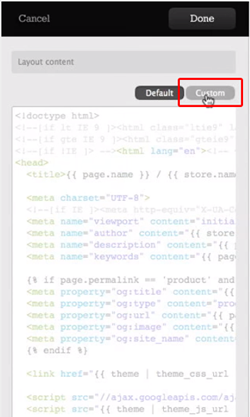
Step 4
Expand the code editor window
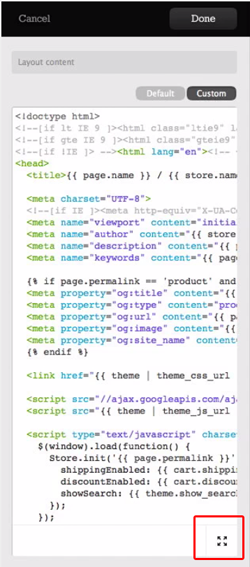
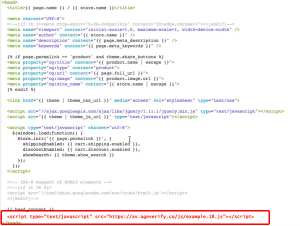
Step 5
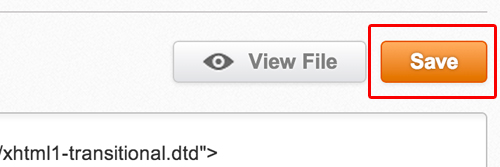
From the editor, scroll down until you locate the closing tag (note the preceding forward slash) and then paste your AgeVerify code from the code generator, immediately before the ‘head’ tag as shown in the image below.
Step 6
Save and close the editor. Clear your browser cache and relaunch your website to see the update.
Part A – Configure your code: Use the Code Generator to create your AgeVerify Script.
(opens in a new browser tab)
Part B – Installation Instructions: Use the installation instructions to add your AgeVerify Script into your Bigcommerce website.
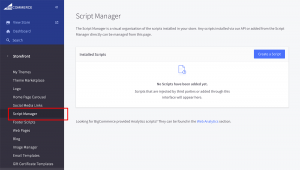
Step 1
From your Bigcommerce Storefront Manager, click on the ‘Storefront’ menu option on the left hand side.
Step 2
From the Storefront sub-menu, click on the ‘Script Manager’ menu option.
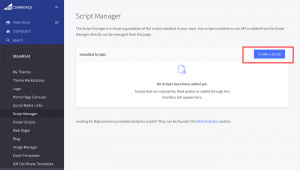
Step 3
Click on the ‘Create a Script’ blue button located on the right hand side.
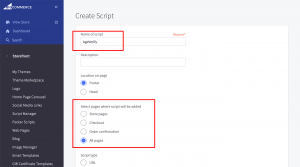
Step 4
Title the script ‘AgeVerify’ and change the ‘Select pages where script will be added’ option to ‘All Pages’
Step 5
Scroll down and change the ‘Script type’ option to ‘Script’
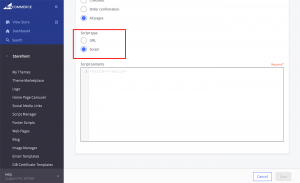
Step 6
Paste in the red AgeVerify Code from the Code Generator in to the ‘Script contents’ dialogue box and then click the ‘Save’ button located at the bottom right hand corner.
Part A – Configure your code: Use the Code Generator to create your AgeVerify Script.
(opens in a new browser tab)
Part B – Installation Instructions: Use the installation instructions to add your AgeVerify Script into your Cratejoy website.
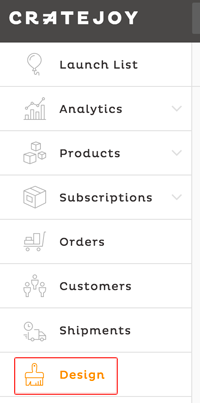
Step 1
From the Cratejoy Administrator Dashboard, click on the ‘Design’ menu option on the left hand side.
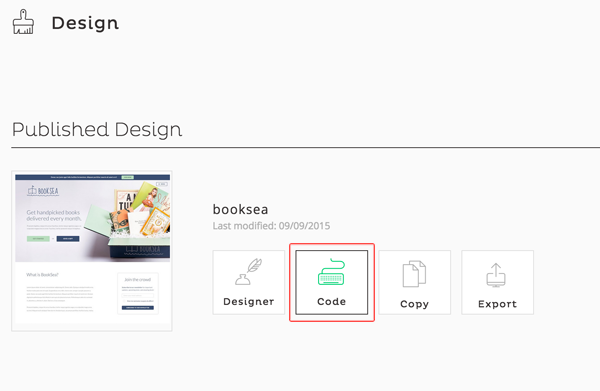
Step 2
From the initial ‘Design’ page, click on the ‘Code’ button option located near the middle of the screen.
Step 3
From the secondary ‘Design’ page within the file structure menu, click on the ‘base.html’ file.
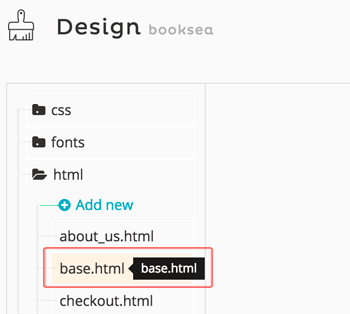
Step 4
From the HTML editor, scroll to the very bottom of the page and then paste the AgeVerify Code from the Code Generator above just BEFORE the closing ‘/body’ element.
![]()
Step 5
Scroll back to the top of the editor and click the ‘Save’ button located on the right hand side.

Part A – Configure your code: Use the Code Generator to create your AgeVerify Script.
(opens in a new browser tab)
Part B – Installation Instructions: Use the installation instructions to add your AgeVerify Script into your CS-Cart website.
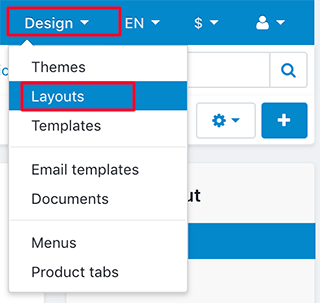
Step 1
From the Dashboard, click on the ‘Design’ dropdown at the top right hand corner of the screen and select ‘Layouts’.
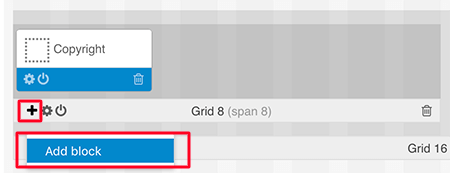
Step 2
Scroll down to the bottom of the page and locate the section titled ‘FOOTER’. Locate any existing Grid within the FOOTER and hover over the grid until the 3 icon menu option appear at the bottom left of that Grid and then click ‘Add Block’
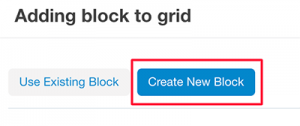
Step 3
From the ‘Adding block to grid’ popup, choose ‘Create New Block’ button at the top.
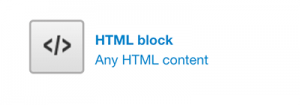
Step 4
Locate and click on the ‘HTML Block’ option.
Step 5
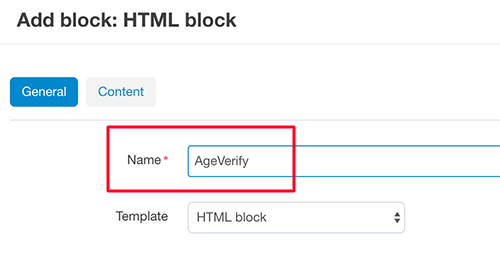
Name the block ‘AgeVerify’
Step 6
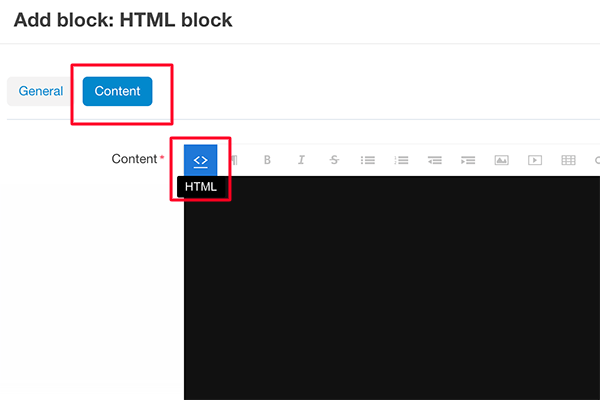
Click on the Content button and then click on the script toggle button to enable the code editor (editor should turn black when clicked).
Step 7
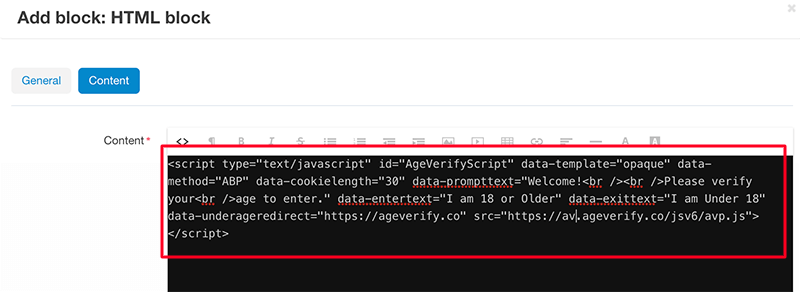
Copy and paste the AgeVerify code from the code generator into the code editor.
Step 8
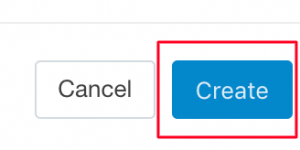
Click the ‘Create’ button at the bottom right hand corner of the screen.
Step 9
Your changes will automatically be saved. You can now view your website with AgeVerify added.
Part A – Configure your code: Use the Code Generator to create your AgeVerify Script.
(opens in a new browser tab)
Part B – Installation Instructions: Use the installation instructions to add your AgeVerify Script into your website.
Step 1
Paste the AgeVerify Code from the code generator above in to the ‘head’ or ‘body’ section of your website page(s).
Step 2
Completely close and reopen all browser windows and navigate to your website to see the newly added age verification. Note, you might need to clear your browser cache to view the update, or you can view your website in a new private / incognito window.
Part A – Configure your code: Use the Code Generator to create your AgeVerify Script.
(opens in a new browser tab)
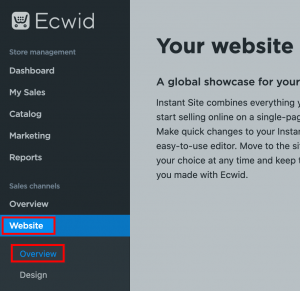
Part B – Installation Instructions: Use the installation instructions to add your AgeVerify Script into your Ecwid website.
Step 1
From your Ecwid Control Panel Dashboard, click the ‘Website | Overview’ menu items located on the left hand side.
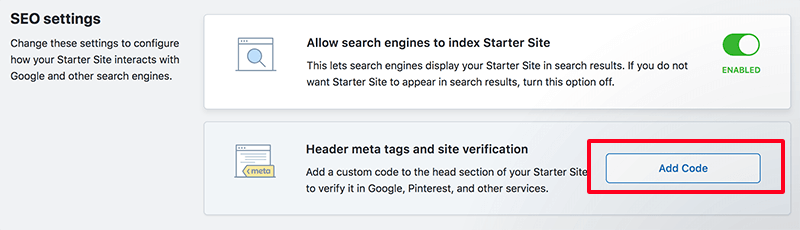
Step 2
Scroll down the main page until you locate the ‘SEO Settings’ section and click the ‘Add Code’ button. (Note, if you already have code located in this section it will instead be titled ‘Edit’.)
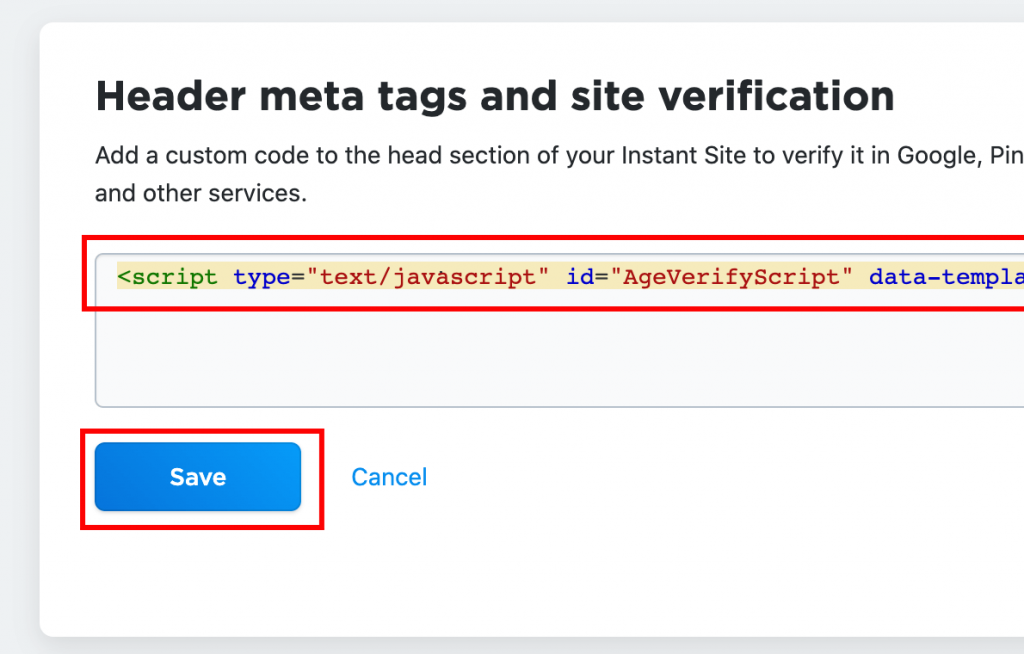
Step 3
Copy and paste the AgeVerify code from the Code Generator in to the input box and click the blue ‘Save’ button.
Part A – Configure your code: Use the Code Generator to create your AgeVerify Script.
Part B – Installation Instructions: Review the video below for step by step installation instructions to add your AgeVerify instance in to your GoDaddy website.
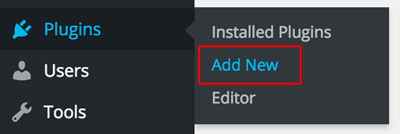
You can download the AgeVerify WordPress plugin directly from the WordPress plugin repository located here: https://wordpress.org/plugins/ageverify/ …or you can locate our plugin by searching for ‘AgeVerify’ directly within the WordPress plugins > Add New page.
Step 2
From your WordPress Admin dashboard, navigate on the left hand side menu to ‘Plugins’ > ‘Add New’
Step 3
From the plugin page, click the ‘Upload Plugin’ button.

Step 4
Click the ‘Choose File’ and upload the previously downloaded ageverify.zip file.
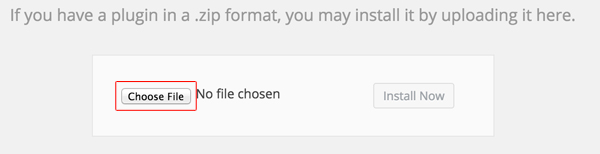
Step 5
Click the ‘Install Now’ button on the AgeVerify plugin. Note, you should see the file ageverify.zip listed.

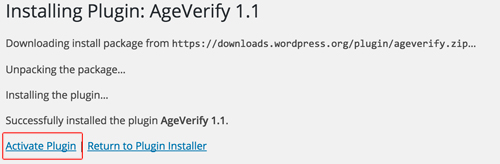
Step 6
Once the AgeVerify plugin has unpacked and installed, Click the ‘Activate Plugin’ button.
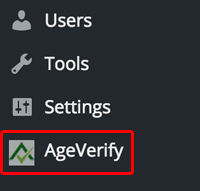
Step 7
Click the newly added menu item in your left hand menu titled ‘AgeVerify’
Step 8
From the plugin configuration page, set ‘Enable’ to ‘On’ and set your configuration as desired. Then click the ‘Save Changes’ button at the bottom of the page.
Step 9
Reload your website and your new AgeVerify prompt will appear.
Part A – Configure your code: Use the Code Generator to create your AgeVerify Script.
(opens in a new browser tab)
Part B – Installation Instructions: Use the installation instructions to add your AgeVerify Script into your Jimdo website.
Part A – Configure your code: Use the Code Generator to create your AgeVerify Script.
(opens in a new browser tab)
Part B – Installation Instructions: Use the installation instructions to add your AgeVerify Script into your Lightspeed website.
Part A – Configure your code: Use the Code Generator to create your AgeVerify Script.
(opens in a new browser tab)
Part B – Installation Instructions: Use the installation instructions to add your AgeVerify Script into your Magento website.
Step 1
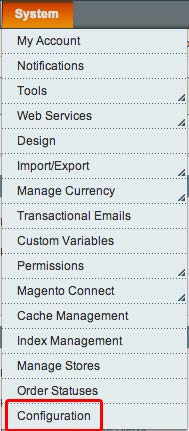
Once logged in to your Magento admin panel, from the top-level navigation, go to ‘System’ and click on ‘Configuration’.
Step 2
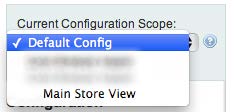
Select the appropriate Configuration Scope on the left hand panel that corresponds with the storefront you are adding Age-Verify to.
Step 3
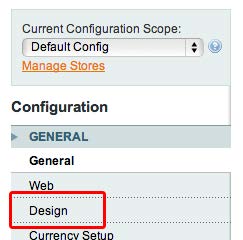
Click the ‘Design’ button from the left hand panel
Step 4
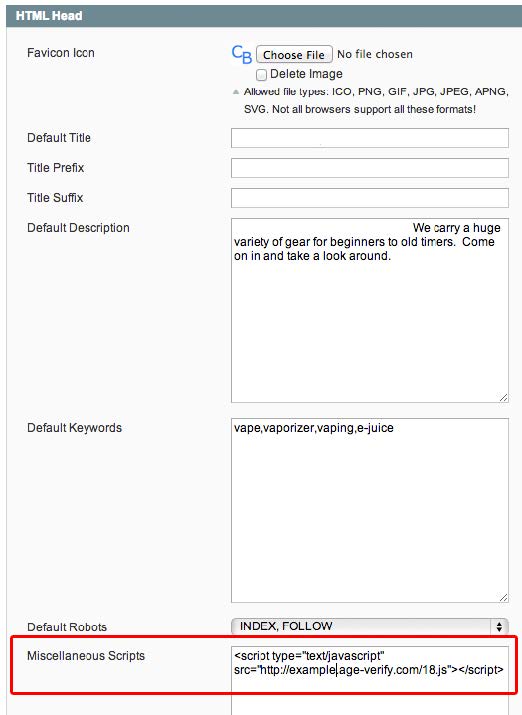
From the ‘Design’ section, scroll down to the ‘HTML Head’ section and expand the panel.
Step 5
Paste the AgeVerify code from the Code Generator above.
Step 6
Click the ‘Save Config’ button in the upper Right hand corner.

Part A – Configure your code: Use the Code Generator to create your AgeVerify Script.
(opens in a new browser tab)
Part B – Installation Instructions: Use the installation instructions to add your AgeVerify Script into your OpenCart website.
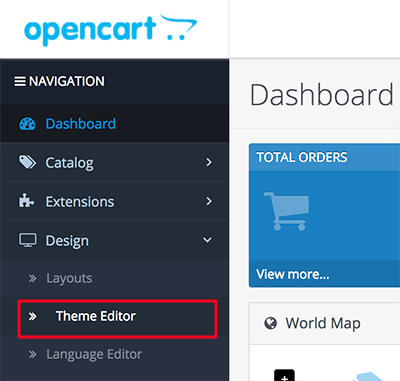
Step 1
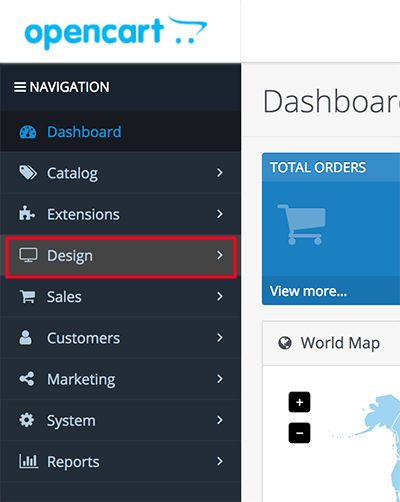
From your OpenCart Dashboard, select the ‘Design’ menu option on the left hand side.
Step 2
From the expanded ‘Design’ sub-menu, select the ‘Theme Editor’ menu option.
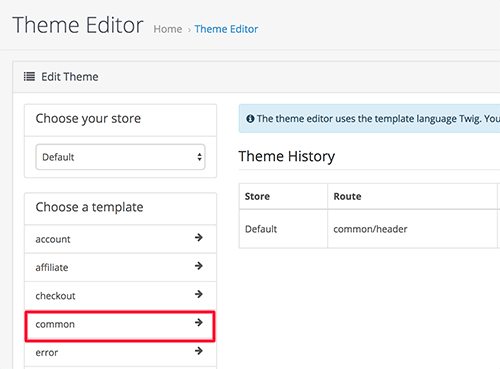
Step 3
From the Theme Editor panel, select the ‘common’ menu option under the ‘Choose a template’ list.
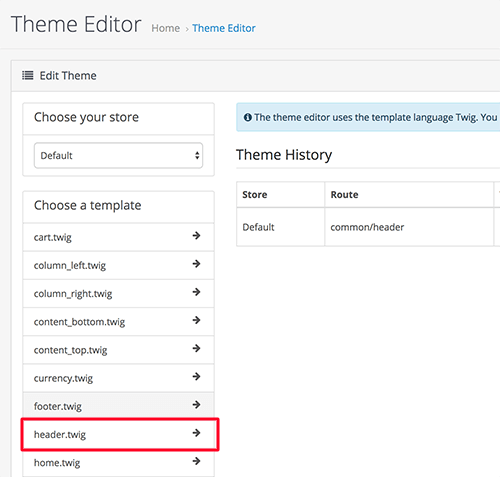
Step 4
From the expanded menu, choose the ‘header.twig’ menu option.
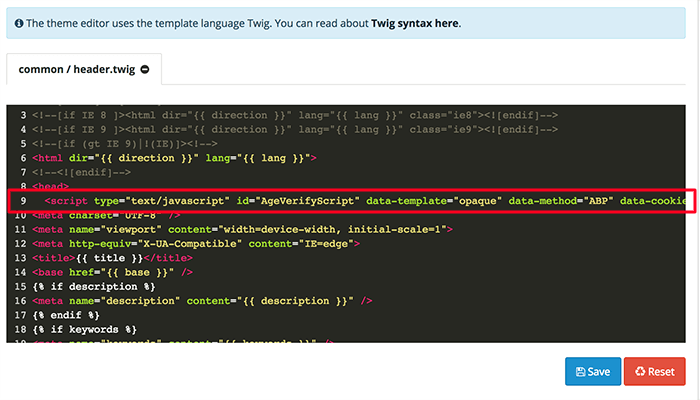
Step 5
From the header.twig code editor panel, copy and paste the AgeVerify code from the Code Generator above directly after the opening ‘head’ tag and then click the ‘Save’ button on the bottom right hand corner.
Part A – Configure your code: Use the Code Generator to create your AgeVerify Script.
(opens in a new browser tab)
Part B – Installation Instructions: Use the installation instructions to add your AgeVerify Script into your PrestaShop website.
Step 1
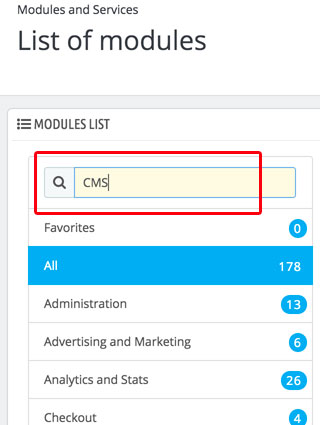
From your PrestaShop admin dashboard, click on the ‘Modules and Services’ menu.

Step 2
From the ‘List of modules’ page, scroll down to the ‘MODULES LIST’ panel and search ‘CMS’ in the search box.
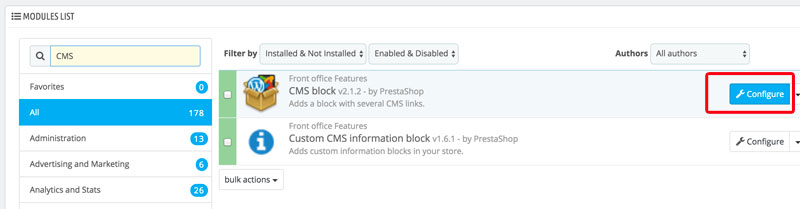
Step 3
On the right side of the screen, click the ‘Configure’ button for the corresponding CMS block module.
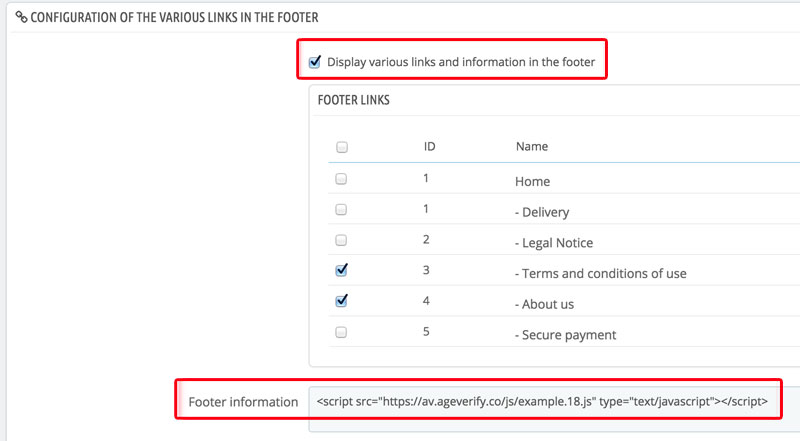
Step 4
From the ‘Configure’ page, scroll down to the ‘CONFIGURATION OF THE VARIOUS LINKS IN THE FOOTER’ panel. Make sure ‘Display various links and information in the footer’ is checked, and then copy and paste the AgeVerify script in to the Footer Information input section.
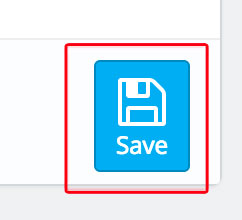
Step 5
Be sure to scroll to the bottom of the page and click the ‘Save’ button on the right hand side.
Part A – Configure your code: Use the Code Generator to create your AgeVerify Script.
(opens in a new browser tab)
Part B – Installation Instructions: If needed, watch the short tutorial below on how to add AgeVerify code into a Shopify website.
Part A – Configure your code: Use the Code Generator to create your AgeVerify Script.
(opens in a new browser tab)
Part B – Installation Instructions: Use the installation instructions to add your AgeVerify Script into your SiteSwan website.
Part A – Configure your code: Use the Code Generator to create your AgeVerify Script.
(opens in a new browser tab)
Part B – Installation Instructions: Use the installation instructions to add your AgeVerify Script into your Spark Pay website.
Step 1
From your Spark Pay dashboard, click on the ‘Themes’ menu item located on the left hand side.
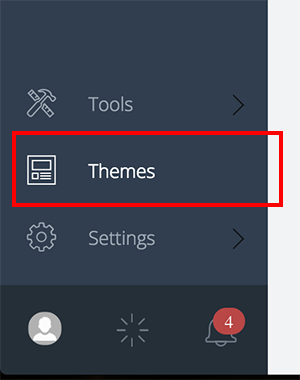
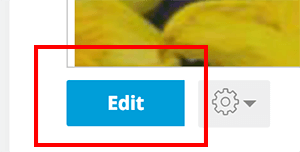
Step 2
Click the ‘Edit’ button located directly below the preview image of your active theme.
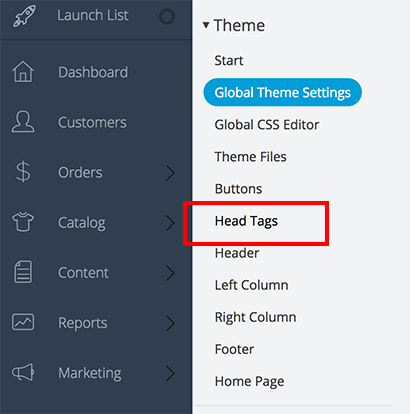
Step 3
From the ‘Global Theme Settings’ page, click on the ‘Head Tags’ sub menu item
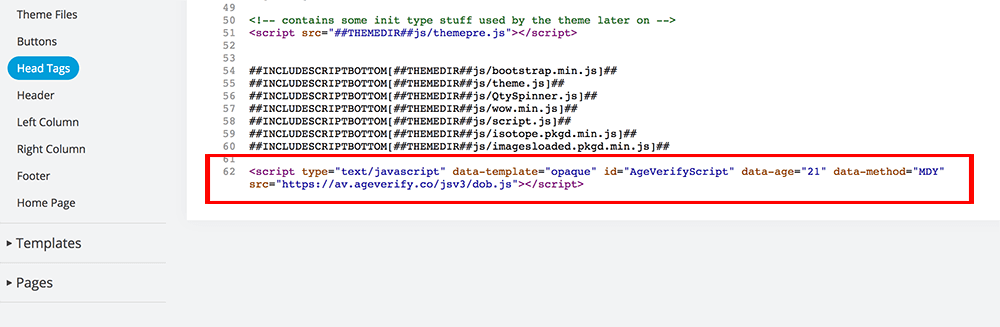
Step 4
From the ‘Head Tags’ editor, scroll all the way down to the bottom, add a couple of new lines and paste in the line of red code from the Code Generator above.
Step 5
Click the ‘Save’ button located in the upper right hand corner.
Part A – Configure your code: Use the Code Generator to create your AgeVerify Script.
(opens in a new browser tab)
Part B – Installation Instructions: Use the installation instructions to add your AgeVerify Script into your Squarespace website.
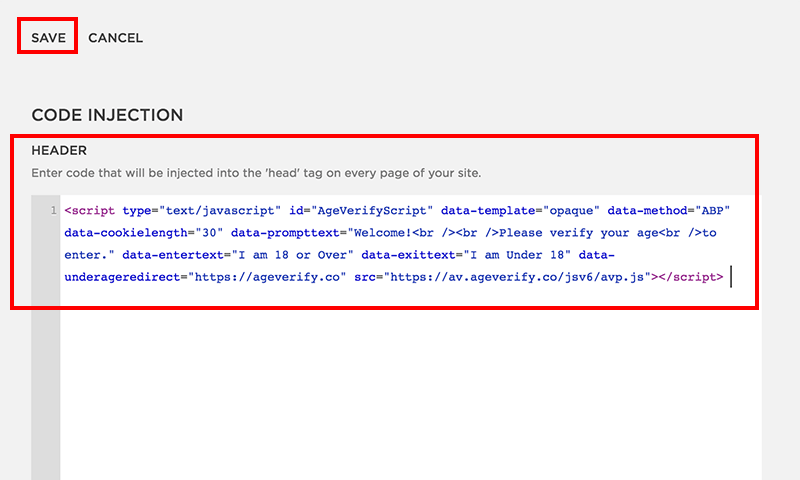
Step 1
From the Squarespace config page, click on the ‘Settings’ option.
Step 2
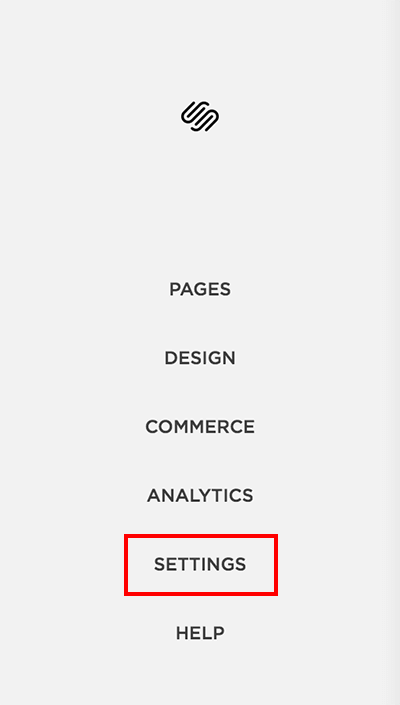
From the Settings menu, scroll down to the ‘Website’ section and click on the ‘Advanced’ option.
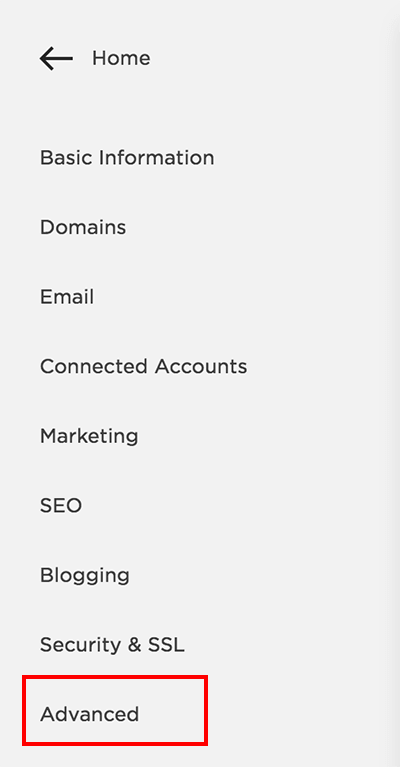
Step 3
From the Advanced menu, scroll down and click on the ‘Code Injection’ option.
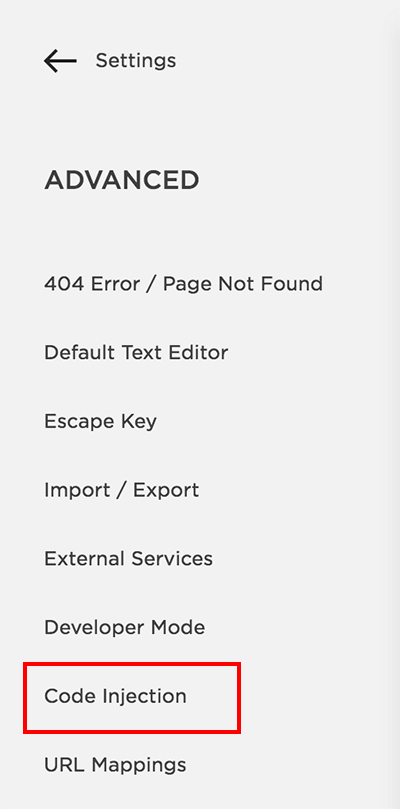
Step 4
From the Code Injection page, paste the AgeVerify code from the Code Generator above in to the ‘Header’ section and then click the ‘Save’ button located at the top left hand side of the screen.
Step 5
Close and reload your website. Note, your website will need to be live in order to see the changes.
Part A – Configure your code: Use the Code Generator to create your AgeVerify Script.
(opens in a new browser tab)
Part B – Installation Instructions: Use the installation instructions to add your AgeVerify Script into your Strikingly website.
Step 1
From the Strikingly website editor, click on the ‘Settings’ button on the left hand side.
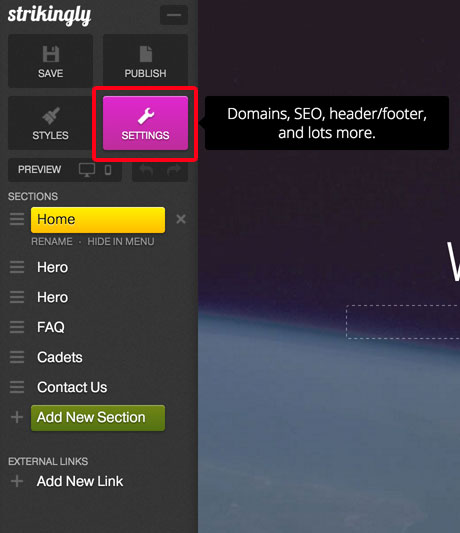
Step 2
From the ‘Settings’ panel, click on the ‘Show Advanced’ button to expand the option selections.
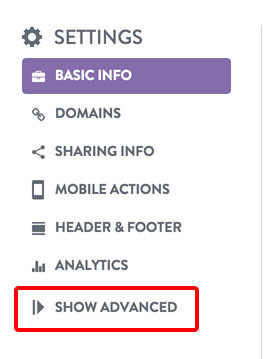
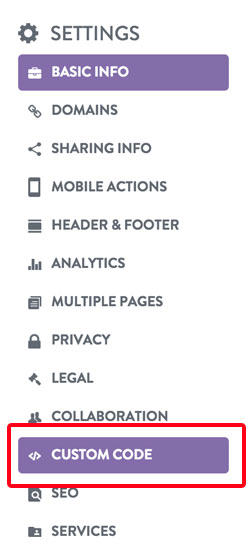
Step 3
With the options expanded, click on the ‘Custom Code’ button.
Step 4
From the Custom Code panel, click the ‘Footer Code’ tab and paste in the AgeVerify code from the generator above. When done, be sure to click on the ‘Update’ button at the bottom of the Custom Code panel.
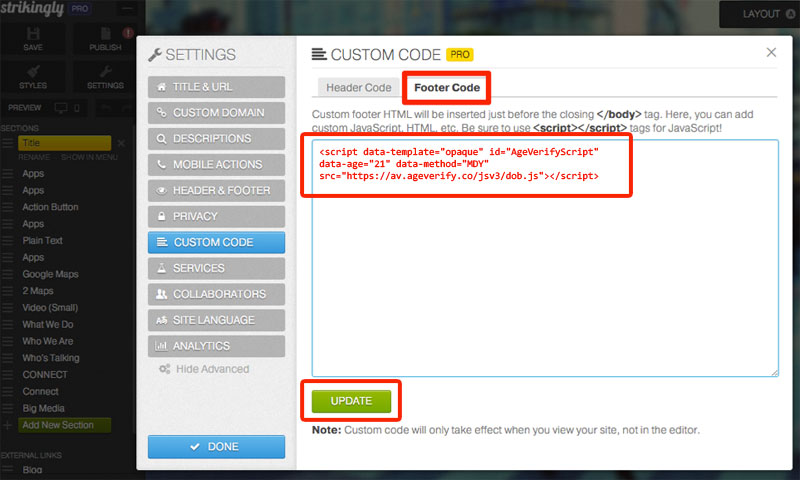
Step 5
Close your browser and relaunch to view your website with the new AgeVerify code.
Part A – Configure your code: Use the Code Generator to create your AgeVerify Script.
(opens in a new browser tab)
Part B – Installation Instructions: Use the installation instructions to add your AgeVerify Script into your Supadupa website.
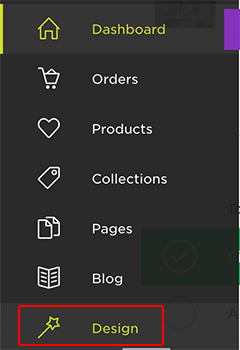
Step 1
From the Supadupa dashboard, click on the ‘Design’ menu option located on the left hand side.
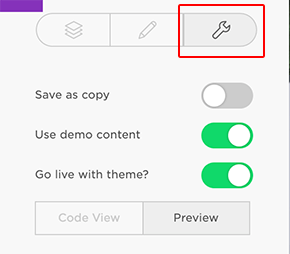
Step 2
From the Design section, click the Wrench icon.
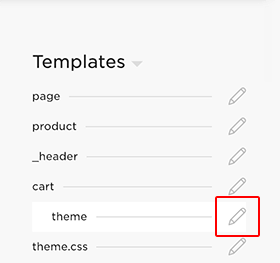
Step 3
Scroll down to the ‘Templates’ section and click on the pencil icon to the right of the ‘theme’ option.
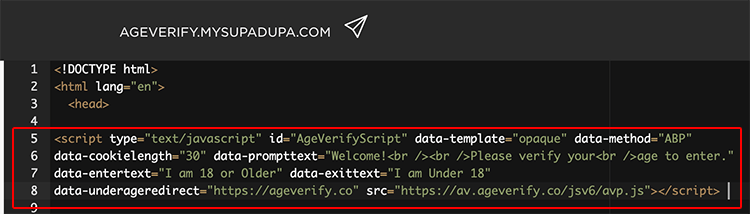
Step 4
Paste the AgeVerify code from the Code Generator above in to the code editor on the right hand side of the screen, immediately after the first ‘head’ tag. (note, your code will likely paste all on a single line which is fine).
Step 5
Toggle the ‘Save as copy’ option to on and make sure the ‘Go live with theme?’ option is enabled.

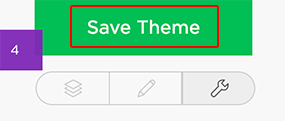
Step 6
Click the ‘Save Theme’ button.
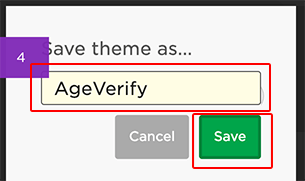
Step 7
Title the newly saved theme as ‘AgeVerify’ and click the additional ‘Save’ button.
Step 8
You can now preview your website with the new AgeVerify overlay added.
Part A – Configure your code: Use the Code Generator to create your AgeVerify Script.
(opens in a new browser tab)
Part B – Installation Instructions: Use the installation instructions to add your AgeVerify Script into your Volusion website.
Step 1
Log in as Admin to your Volusion website and navigate to the Dashboard (note, this is the default starting point for most logins).
Step 2
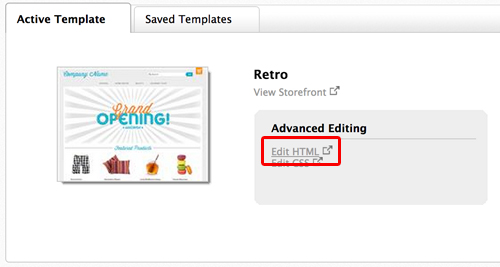
Navigate to the templates page, by selecting the category ‘Design’ and then ‘Template’ from the top menu bar as shown below.

Step 3
From the templates page, click the ‘Edit HTML’ link for your active template (note, new window will open)
Step 4
From the Editor, paste the AgeVerify code from the Code Generator above for your template immediately after the first ‘head’ tag as shown in the image below.

Step 5
Click the ‘Save’ button in the upper right hand corner above the editor.
Part A – Configure your code: Use the Code Generator to create your AgeVerify Script.
(opens in a new browser tab)
Part B – Installation Instructions: Use the installation instructions to add your AgeVerify Script into your Webflow website.
Part A – Configure your code: Use the Code Generator to create your AgeVerify Script.
(opens in a new browser tab)
Part B – Installation Instructions: Use the installation instructions to add your AgeVerify Script into your Weebly website.
Step 1
Log in to your Weebly Admin Panel and click on the ‘Settings’ button at the top of the page

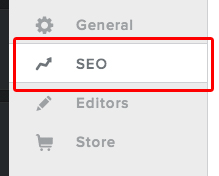
Step 2
Click on the ‘SEO’ button on the left hand side
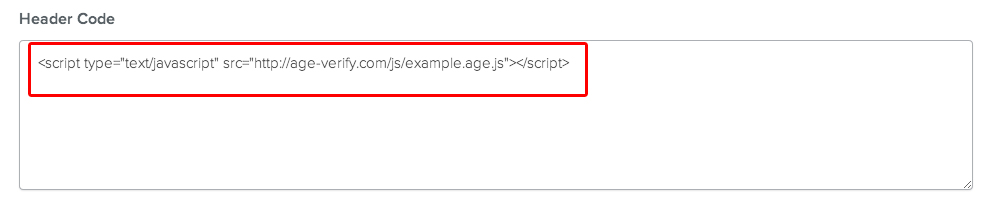
Step 3
From the SEO page, paste the AgeVerify code from the Code Generator above in to the ‘Header Code’ section.
Step 4
Click the ‘Save’ button at the bottom right of the page.

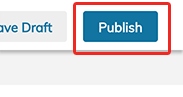
Step 5
Click the ‘Publish’ button at the top right of the page.
![]()
Part A – Configure your code: Use the Code Generator to create your AgeVerify Script.
(opens in a new browser tab)
Part B – Installation Instructions: Use the installation instructions to add your AgeVerify Script into your Wix website.
Step 1
From your Wix Dashboard, Select ‘Settings’ on the left hand side navigation menu.

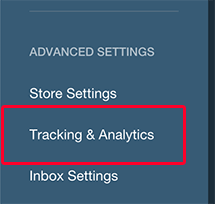
Step 2
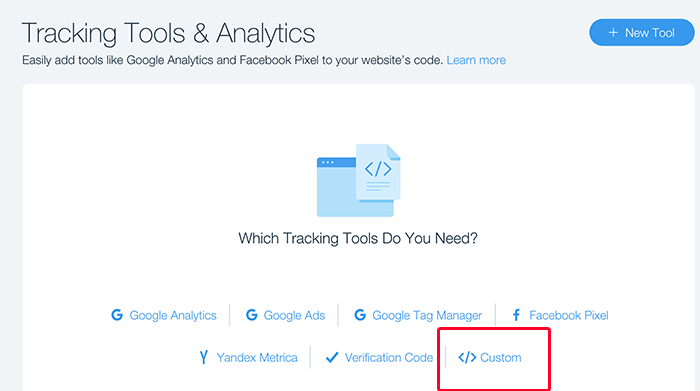
From the Settings sub-menu, scroll down to the bottom of the screen and select the ‘Tracking & Analytics’ option under the ‘Advanced Settings’.
Step 3
Select the ‘</> Custom’ option
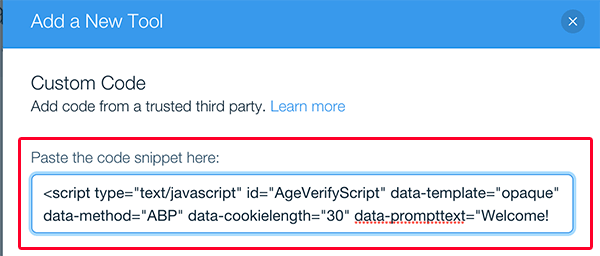
Step 4
Paste the AgeVerify code from the code generator above directly in to the top input box.
Step 5
Change the ‘Add Code to Pages’ first dropdown to the ‘Load code on each new page’ option.

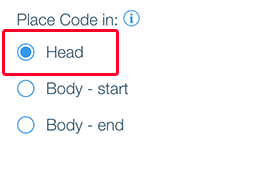
Step 6
Make sure the Place Code in ‘Head’ option is selected.
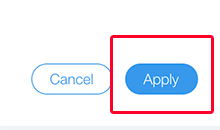
Step 7
Click ‘Apply’
Step 8
Return to the main menu and click on Dashboard. The preview of your website will now include your AgeVerify prompt.
You can download the AgeVerify WordPress plugin directly from the WordPress plugin repository located here: https://wordpress.org/plugins/ageverify/ …or you can locate our plugin by searching for ‘AgeVerify’ directly within the WordPress plugins > Add New page.
Step 2
From your WordPress Admin dashboard, navigate on the left hand side menu to ‘Plugins’ > ‘Add New’
Step 3
From the plugin page, click the ‘Upload Plugin’ button.
Step 4
Click the ‘Choose File’ and upload the previously downloaded ageverify.zip file.
Step 5
Click the ‘Install Now’ button on the AgeVerify plugin. Note, you should see the file ageverify.zip listed.
Step 6
Once the AgeVerify plugin has unpacked and installed, Click the ‘Activate Plugin’ button.
Step 7
Click the newly added menu item in your left hand menu titled ‘AgeVerify’
Step 8
From the plugin configuration page, set ‘Enable’ to ‘On’ and set your configuration as desired. Then click the ‘Save Changes’ button at the bottom of the page.
Step 9
Reload your website and your new AgeVerify prompt will appear.
Part A – Configure your code: Use the Code Generator to create your AgeVerify Script.
(opens in a new browser tab)
Part B – Installation Instructions: Use the installation instructions to add your AgeVerify Script into your Zoey website.
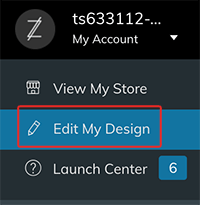
Step 1
From the Zoey administrator panel, click on the ‘Edit My Design’ menu option in the upper left hand corner.
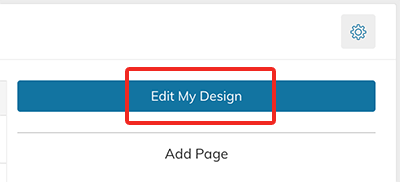
Step 2
From the ‘Edit My Design’ page, click on the ‘Edit My Design’ button located in the upper right hand corner of the screen.
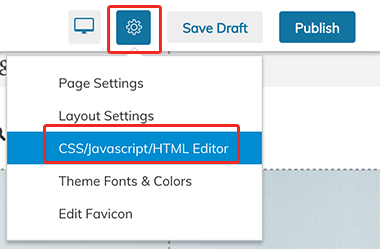
Step 3
From the Design Editor, click on the gear icon dropdown located in the upper right hand corner and then select the ‘CSS/Javascript/HTML Editor’ sub-menu item.
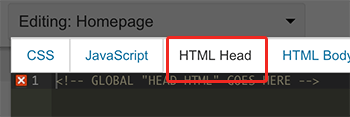
Step 4
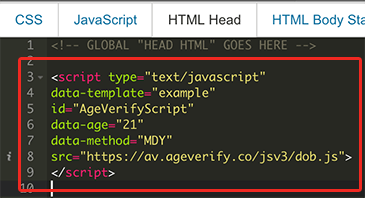
From the Code Editor, click on the ‘HTML Head’ panel button.
Step 5
From the HTML Head editor panel, paste the AgeVerify code from the Code Generator above into the editor.
Step 6
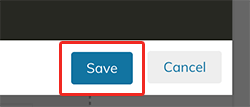
Click the ‘Save’ button located at the bottom right hand corner of the HTML editor.
Step 7
From the Design Editor, click the ‘Publish’ button located at the top right hand corner of the screen.